No products in the cart.
Outdoor Adventure
How to Pick a Backpack: The Ultimate Guide
Going backpacking? Well, there are about a trillion guides for which widget will make an imperceptible improvement to your hike. You may not need a tri-folding pour over kit, but we’re certain you’ll need a backpack. Choosing the right backpack can make or break your vacation, your honeymoon, or your thru-hike. Here’s an expert’s advice designed to make the choice simple. Oh, and we’ll teach you the best way to pack it, too.
Which Backpack Style Is Right For You?
Pretty much all backpacks employ internal frames these days. Even the fancy ultralight Dyneema packs that are all the rage these days use a few aluminum stays that can be considered a frame. Stick with an internal-frame backpack unless you’re an experienced hiker with a specific requirement that necessitates a burlier external frame.
But there are infinite options for internal frame backpacks out there. One big differentiating factor is how the pack rests against your body.
Cheaper options (or speciality ones designed either to support immense weights or to be used in cold conditions) will use foam back pads that sit flush against your body.
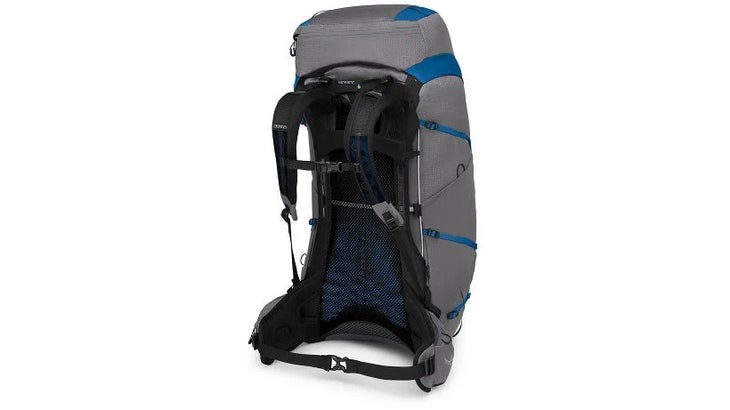
Mesh suspension, which is tensioned between the frame stays, conforms to your body and provides an air gap between you and the pack. Mesh suspension is a more broadly comfortable design that works well across different body shapes, and will keep you cool on the trail.

Which Size Backpack Should You Buy?
For anything beyond a day hike, most backpackers will want a pack between 45 and 65 liters in capacity. If you have a smaller body, choosing a smaller capacity will increase comfort, decrease weight, and, since your clothing and sleep system are probably smaller too, should correspond to the size of your stuff. The opposite is true if you’re larger.
If you’re planning a trip in adverse weather conditions, one that’s more than three nights long, or you have gear to carry to support additional activities, you’ll want a pack at the larger end of that range so you can fit all your stuff.
Sizes larger than 65 liters exist to support speciality uses like mountaineering or hunting, which then also dictate their own designs and materials that may compromise comfort on the trail and typically add cost. Unless you need a bag specifically to haul ropes or quarters, try and avoid buying a pack larger than 65 liters.
Which Backpack Features Should You Look For?
It’s the frame’s job to support the weight carried in the pack and transfer it down into the hip belt, where it can be supported by the largest muscle group in your body—your legs. So, beyond suspension and capacity, the single most important aspect of a pack is hip belt design.
In order to support that weight, a hip belt must be rigid when it’s secured to your body. Belts that flex and twist will do so when loaded, creating pressure points and chafing as you walk. Look for belts that can’t be twisted or otherwise deformed when fastened, and which feel comfortable on your unique body.
Beyond fit, packs may offer all manner of straps, pockets, zippers, clips and fabrics. Because all of that adds weight and potential points of failure, the best packs are often the simplest ones. Look for a fabric that’s robust enough to hold together and shed some precipitation, but avoid anything that’s actually waterproof, overbuilt, or over-featured.
If a pack comes with a removable summit pack/lid, excess webbing to attach bulky objects, or other non-mission-critical features, consider removing or cutting them off once you’re sure you don’t need to return it.
Also think about how you want to carry your water. Bladders help locate water’s weight close to your body, inside the pack. Bottles are easier to access. The former requires a sleeve and the latter specialty pockets (or a willingness to get in and out of your pack).
How Should A Backpack Fit?
Fit is the single most important factor when selecting a backpack. You can only determine fit by trying packs on, so plan on visiting a big box store with a good selection, or ordering from an online retailer with a generous return policy.
Fit starts with torso length, which is typically measured from your C7 vertebra at the base of your neck to the iliac crest at your hips. Grab an assistant, and have them use a soft tape measurer to determine that length, then compare it to size guides.
Packs are typically available in different sizes, corresponding to different torso lengths. Many packs will then be adjustable within those sizes, to achieve a personalized fit.
A pack fits your exact torso length when its waist belt is centered over your iliac crests, and the shoulder straps conform to your shoulders without a gap, but also without placing weight on them.
But there are other factors to fit beyond torso length, which is why trying on packs is so important. Waist strap lengths typically feature broad adjustability, but should you fall outside average dimensions, you many need one that’s longer or shorter than is typical. Shoulder widths are also highly personal, and are one of the factors that differentiate packs designed for men and women. And chest shape and size will also interact with those straps, and the sternum strap that keeps those shoulder straps from sliding around.
How Should You Adjust A Backpack?
It’s crucial to try on a pack loaded up with weight roughly approximate to what you’ll carry on the trail. This is where a good return policy is crucial, because it’s going to be easiest to load a pack up at home.
If your pack has an adjustable torso, set it to the length you determined earlier, unloaded. Then loosen all the rest of the straps at the belt. For the shoulders, loosen the load lifters (the small straps that connect the top of the shoulder straps to the top of the pack), and the sternum strap that runs across your chest. Then load up the pack, pick it up by the shoulder straps, slide one arm through at a time, and fasten the waist belt.
Tighten the waist belt so the buckle remains centered on your body such that the belt is snug but not overly constricting. Then pull down on the shoulder strap length adjusters until they conform to your shoulders. Next, pull on the load lifters to bring the pack snug (but not tight) to your body. Lastly, adjust the height and tension of the sternum strap so that it lays flush to your chest, but isn’t tight. Its job is to prevent the shoulder straps from moving inward and outwards, chafing your shoulders and armpits.
Then go for a walk or hike, with a loaded pack, making adjustments as comfort dictates. Take note of what you’re changing and to what degree. While you can just leave your adjustments in place and throw on the pack next time you’ll use it, you’ll end up adjusting most of the straps throughout any hike based on your layers and the temperature.
Do You Need An Ultralight Backpack?
You’re probably better off without one. Cutting weight is the best way to improve comfort and performance on the trail, but effectively minimizing weight involves a systematic approach in which the weight of the actual backpack is the least important factor. And, the weight of a pack itself typically corresponds to its capacity—both weight and volume. Trying to press an ultralight pack into carrying normal camping gear is a recipe for pain.
I’ve previously explained the approach it takes to achieve a truly ultralight base weight (mine’s seven pounds). Getting there involves a lot of dollar signs and sacrifices. If you just want to shed some weight on your next camping trip, the simplest and most effective approach remains to take less stuff.
How Should I Pack a Backpack?
The standard logic for packing a backpack is that anything heavy should sit as close as possible to your center of mass. After that, you should prioritize packing your gear by how quickly you might need to access it. Also, if you’re hiking somewhere it rains often, or are out for longer than three days, lining your backpack with a compactor bag is a safe bet.
I suggest you begin by placing your sleeping bag at the bottom of your pack, and stuffing sleeping layers around it to eliminate any dead space. Above that you can place heavy items close to your back, like parts of your tent, your stove, water bladder, and dinners and breakfasts you won’t need while hiking. You can surround those with clothing like a puffy jacket on the outside to keep the heavy items snug against your back. On top you’ll want your lunch or snacks for the day, a rain or wind shell, and your navigation and first aid kit. If you have a closed-cell foam pad, you can lash that to the outside of your pack. As a bonus, it makes a great sit pad during lunch breaks.
What Should You Pack For A Backpacking Trip?
Here’s a simple list. Sizing this gear as closely as possible to your needs will help reduce weight and size (if you’re going solo, carry a one-person tent, for example).
Sleep System
- Sleeping Pad
- Sleeping Bag
- Tent
Clothing
- The pants you plan to wear
- The socks you plan to wear plus an extra pair
- The shirt you plan to wear
- Hiking boots
- Base layer tights
- Mid-layer
- Puffy jacket
- Rain jacket
- Sun hat
Food and Water
- Stove with fuel and pot
- Lighter
- Dehydrated food packs
- Spork
- Meal bars
- Water bottle
- Water filter, eyedropper full of bleach, or treatment tabs
- Whiskey (Optional for some, not for me)
Personal
- Pocketknife or multitool
- Hand sanitizer
- Spade, TP and hand sanitizer
- Toothbrush and paste
- Chapstick
- Sunscreen
- Headlamp
Navigation
If you carry only that, and nothing more, you’ll enjoy hiking with a light backpack, no matter what budget you start with.
One Last Question:
How Do I Wash a Backpack?
Our friends at Backpacker made a handy guide.
Source link

